Tuesday, June 30, 2015

Code-first vs Model/Database-first

What are the pros & cons of using Entity Framework 4.1 Code-first over Model/Database-first with EDMX diagram?

I'm trying to fully understand all the approaches to building data access layer using EF 4.1. I'm using Repository pattern and IoC.
I know I can use code-first approach: define my entities and context by hand and use ModelBuilderto fine-tune the schema.
I can also create an EDMX diagram and choose a code generation step that uses T4 templates to generate the same POCO classes.
In both cases I end up with POCO object which are ORM agnostic and context that derives from DbContext.
Database-first seems to be most appealing since I can design database in Enterprise Manager, quickly synch the model and fine-tune it using the designer.
So what is the difference between those two approaches? Is it just about the preference VS2010 vs Enterprise Manager?

I think the differences are:
Code first
  • Very popular because hardcore programmers don't like any kind of designers and defining mapping in EDMX xml is too complex.
  • Full control over the code (no autogenerated code which is hard to modify).
  • General expectation is that you do not bother with DB. DB is just a storage with no logic. EF will handle creation and you don't want to know how it do the job.
  • Manual changes to database will be most probably lost because your code defines the database.

Database first
  • Very popular if you have DB designed by DBAs, developed separately or if you have existing DB.
  • You will let EF create entities for you and after modification of mapping you will generate POCO entities.
  • If you want additional features in POCO entities you must either T4 modify template or use partial classes.
  • Manual changes to the database are possible because the database defines your domain model. You can always update model from database (this feature works quite good).
  • I often use this together VS Database projects (only Premium and Ultimate version).
Model first
  • IMHO popular if you are designer fan (= you don't like writing code or SQL).
  • You will "draw" your model and let workflow to generate your database script and T4 template to generate yout POCO entities. You will lose part of control on both your entities and database but for small easy projects you will be very productive.
  • If you want additional features in POCO entities you must either T4 modify template or use partial classes.
  • Manual changes to database will be most probably lost because your model defines the database. This works better if you have Database generation power pack installed. It will allow you updating database schema (instead of recreating) or updating database projects in VS.
I expect that in case of EF 4.1 there are several other features related to Code First vs. Model/Database first. Fluent API used in Code first doesn't offer all features of EDMX. I expect that features like stored procedures mapping, query views, defining views etc. works when using Model/Database first and DbContext (I didn't try it yet) but they don't in Code first.

3 reasons to use code first design with Entity Framework


Less cruft,

more control, and 

database version control


The .NET Entity Framework has come a long way since its early beginnings as an NHibernate alternative and the successor to LinqToSQL. Currently in version 6.0, the ORM is stable and mature but you still have an important decision to make when you start a new project. Which of the four design workflows will you use? Here are 3 reasons why you might use the code first approach.
The workflows you have to choose from are:
Code first creating a new database
Code first to an existing database
Model designer creating a new database
Existing database to generated model

In the past I used #4 most frequently because it was the quickest path to get a system up and running. You can rapidly develop your database design in SQL Management Studio then generate the code model in just few clicks. More recently I’ve come to prefer #1 (or #2) for the following reasons.

1) Less cruft, less bloat

Using an existing database to generate a .edmx model file and the associated code models results in a giant pile of auto generated code. You’re implored never to touch these generated files lest you break something, or your changes get overwritten on the next generation. The context and initializer are jammed together in this mess as well. When you need to add functionality to your generated models, like a calculated read only property, you need to extend the model class. This ends up being a requirement for almost every model and you end up with an extension for everything.
With code first your hand coded models become your database. The exact files that you’re building are what generate the database design. There are no additional files and there is no need to create a class extension when you want to add properties or whatever else that the database doesn't need to know about. You can just add them into the same class as long as you follow the proper syntax. Heck, you can even generate a Model.edmx file to visualize your code if you want.

2) Greater Control

When you go DB first, you’re at the mercy of what gets generated for your models for use in your application. Occasionally the naming convention is undesirable. Sometimes the relationships and associations aren't quite what you want. Other times non transient relationships with lazy loading wreak havoc on your API responses.
While there is almost always a solution for model generation problems you might run into, going code first gives you complete and fine grained control from the get go. You can control every aspect of both your code models and your database design from the comfort of your business object. You can precisely specify relationships, constraints, and associations. You can simultaneously set property character limits and database column sizes. You can specify which related collections are to be eager loaded, or not be serialized at all. In short, you are responsible for more stuff but you’re in full control of your app design.

3)Database Version Control

This is a big one. Versioning databases is hard, but with code first and code first migrations, it’s much more effective. Because your database schema is fully based on your code models, by version controlling your source code you're helping to version your database. You’re responsible for controlling your context initialization which can help you do things like seed fixed business data. You’re also responsible for creating code first migrations.
When you first enable migrations, a configuration class and an initial migration are generated. The initial migration is your current schema or your baseline v1.0. From that point on you will add migrations which are timestamped and labeled with a descriptor to help with ordering of versions. When you call add-migrationfrom the package manager, a new migration file will be generated containing everything that has changed in your code model automatically in both an UP() and DOWN() function. The UP function applies the changes to the database, the DOWN function removes those same changes in the event you want to rollback. What’s more, you can edit these migration files to add additional changes such as new views, indexes, stored procedures, and whatever else. They will become a true versioning system for your database schema.

Wrapping Up

The speed of going the database first or model designer first route is appealing. The result of doing so is even pretty darn good. I’ll definitely still be using the database first method when time is important or when the project is a minor internal effort. For larger efforts or for long term client projects, code first provides us the control we need to create the most efficient program and also gives us the protection and consistency of a versioned controlled database while reducing bloat. There is value in each of the 4 workflows but these are 3 reasons why you might use code first design with Entity Framework.

Not Just a Designer: Code First in Entity Framework

Not Just a Designer: Code First in Entity Framework

Code First is a new development approach in the Entity Framework stack that can simplify the understanding and maintenance of your domain model.
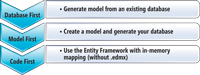
In the middle of 2008, Microsoft published the first version of the Entity Framework (Entity Framework 1) as part of Visual Studio 2008 SP1. The Entity Framework was created as an object-relational mapping (OR/M) tool that helps create an abstraction layer on top of ADO.NET namespaces. When it first shipped, the Entity Framework supplied two development approaches out of the box: the Database First approach and the Model First approach.
In the Database First approach, you started with an existing database and used the Entity Framework wizard to create the Entity Data Model (EDM). The model was built as a one-to-one mapping between the database and the conceptual model, and after it was created you could customize it to make it more like the domain requirements.
On the other hand, the Model First approach was limited in the first version. When Visual Studio 2010 and the Microsoft .NET Framework 4 were shipped, the Model First implementation was improved significantly. In Model First, you could start working with an empty model and create your desired conceptual model. After the creation of the model, you could use the Generate Database Script from Model feature, which wasn't part of the Entity Framework 1 designer, to create the EDM storage and mapping schemas and also to generate a Data Definition Language (DDL) script. The generated DDL script could be used to create a database that would fit to the model according to a Model First workflow.
In the Entity Framework 1, the creation of the store schema definition language (SSDL), mapping specification language (MSL) and the script weren't available, so you needed to handcraft them, as well as create the database. Both of the approaches gave you a lot of flexibility while you built EDMs and could be used by the Entity Framework Designer. But they both forced you to use the designer and an .edmx file to create the EDM more easily.
The new Entity Framework Code First feature can help you use a more domain-driven approach while building your data tier on top of the Entity Framework. Microsoft said it expected to deliver the new functionality before the end of April 2011 -- so it should be available by the time you read this. In Code First, you can use only code without any designer or .edmx files to create the domain model. First you create Plain Old C# Object (POCO) classes that represent the domain model, and then you use a set of built-in tools like a fluent interface, data annotations and conventions in order to configure a runtime EDM for the domain model. Figure 1 summarizes the current Entity Framework development approaches.
Advertisement


[Click on image for larger view.]
Figure 1. Entity Framework development approaches.
This article will explain what the Code First development approach is all about and how to use it in order to implement your data-access layer. The article is based on the Entity Framework Feature community technology preview (CTP) 5, therefore things might change in the official release of Code First.
Let It Be Code
Code First was developed on top of Entity Framework 4 functionality as a stand-alone package. The idea behind it is to supply a simple API for an EDM runtime configuration, providing a second alternative to using .edmx files. The rationale behind the feature is that many developers, including myself, prefer to write code and use conventions instead of using XML files for configurations and modeling. It's faster, more productive, simpler and, of course, less error-prone than a hardcoded static-configuration file. This is why this approach is so essential in the development of a tool like the Entity Framework.
Another driver is domain-driven development principals. Using Code First enables the creation of a domain model without any concern about the persistence layer and how it's going to be implemented.
All you need to do is develop your domain model using POCO classes and let Code First figure out how to create the EDM from it (and even the database in some circumstances). This is implemented by a conventions engine that's built inside the Code First runtime. If you want to change Code First default conventions, there are a lot of extension points in the configuration process, such as a fluent interface API, data annotations and more.
DbContext and DbSet Classes
When starting to develop with Code First, you'll first encounter the new DbContext and DbSet classes. These classes represent a lightweight wrapper implementation on top of the Entity Framework ObjectContext and ObjectSet classes, respectively. You use the DbContext and DbSet classes as you used the ObjectContext and ObjectSet classes, but with less exposed Entity Framework API noise.
Also, there are some new methods that help implement common development needs, such as finding an entity or changing an entity state. If you aren't familiar with ObjectContext and ObjectSet, I suggest you to go to the following MSDN Library pages before you go on with the article: tinyurl.com/6bsoera and tinyurl.com/6988f55.
The DbContext is a main object in Code First that exposes the interaction between the Entity Framework and the database. Its responsibilities include database connectivity, change tracking, data persistence, entities caching and more. It's also a container of all the DbSets that you'll create in order to work against the database.
The DbSet is a collection representation of a set of entities. You can think about it as an in-memory representation of database records, but it's much more than that. It exposes a set of collection methods such as Add and Remove in order to manipulate the set's data. It also enables you to use LINQ to Entities to query its data.
The Domain Model
The first thing I encourage developers to do when they start using Code First is build their domain model. In order to build a domain model you need to build simple POCO classes and a database context that inherit from DbContext. You'll need to add a reference to the EntityFramework assembly, which is installed with the Entity Framework Feature CTP. In Listing 1 you can take a look at the model that I'm using here.
Listing 1 shows a simple model that includes companies and their associated employees. The interesting thing is the CompanyEntities, which is the context to the database. The context is playing the role as the database gateway, which will help to manage the entities' state, open connections and more. It includes two DbSets for each entity set that we have in the model. The entities will be placed in an entities assembly while the context will be placed in the Data Access Layer.
Using only this model is enough to get a runtime EDM. Code First will use its default conventions in order to achieve the building of the EDM during the execution of the application. These conventions include building primary keys out of properties that have the Id suffix, building foreign keys out of entities relations and more. Also, as a side effect, if a database or a connection string to an existing database doesn't exist, the Code First runtime will create a database in the SQL Express server of the current machine.
The calling to the constructor of DbContext with a string parameter, as in 
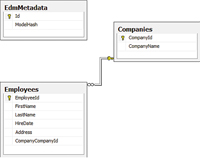
Listing 1, will force Code First to look at whether a connection string with the Manpower name exists. If the connection string exists then it will be used as a connection string to the database; otherwise the supplied string will be used as the database name. If the developer doesn't supply a database name, the convention of the database name is the namespace of the assembly followed by the name of the context (for example, DAL.CompanyEntities). Figure 2 shows the created database after running the model inside a simple console application.

[Click on image for larger view.]
Figure 2. The generated database.
As you can see, the database was created with all the relevant primary keys and foreign keys. Also, an EdmMetadata table was generated. This table is used by the DbContext in order to check whether the database schema matches the current model. Up until now I've done nothing to configure the generated runtime EDM. Let's dive into the EDM configurations.
Using DbModelBuilder and Code First Fluent API
One of the options to configure EDMs in Code First is a fluent API that's supplied through a class called DbModelBuilder. The DbModel-Builder role does all the heavy lifting of creating the EDM during runtime. Using the fluent API can help you configure the generated runtime EDM and shape it to your will.
The main way to configure the runtime generated model is by overriding the DbContext OnModelCreating method. The method gets a DbModelBuilder instance as a parameter, which is used to configure the model. The configuration phase occurs only once in the application, and the generated EDM is stored in the application cache. Listing 2 shows an example of how to write configurations with the fluent API.
First you override the OnModelCreating method in the custom DbContext that you've created. Then, for every aspect you want, you configure the DbModelBuilder using the fluent API. You first choose which element to configure: an entity or a complex type. The example shows how to configure entities by using the Entity generic method. The Entity method indicates on which entity to add the configurations while the ComplexType does the same for complex types.

Three steps for fast entityframework 6.1 code-first startup performance

So you are using entity framework and frustrated about slow application startup? In this blog post I will show you three steps for massively improved first query performance (80% decrease), especially for code-first scenarios. With these steps, first query-time in our application dropped from ~4.5 seconds down to ~ 1 second!

1. Using a cached db model store

  • This has probabily the biggest effect on startup performance and is only necessary if you are using the code first model. Building and compiling large models using the Code First pipeline is extremly expensive in terms of start up time. This step will cache the code-first pipeline with its expensive o-c mapping generation and will store it in a xml file on the filesystem. The next time your application starts, EF will deserialize this cached mapping file which significantly reduces startup time.
    Unfortunately ef does not come with the cached db model store build in, so you need to clone and manually build my DbModelStore branch on github in order to use it. In this branch I integrated a patch provided byentityframework team-member emicolos which he kindly provided here. Once you have done that, you can enable the cached db model store with the following lines of code:
    
    public class MyContextConfiguration : DbConfiguration
    {
        public MyContextConfiguration()
        {
            string cachePath = Environment.GetFolderPath(Environment.SpecialFolder.ApplicationData) + @"\YOUR_APP_NAME\EFCache\";
            MyDbModelStore cachedDbModelStore = new MyDbModelStore(cachePath);
            IDbDependencyResolver dependencyResolver = new SingletonDependencyResolver(cachedDbModelStore);
            AddDependencyResolver(dependencyResolver);
        }
    
        private class MyDbModelStore : DefaultDbModelStore
        {
            private static bool useCachedDbModelStore;
     
            // Note that you should only enable DbContextStore during normal run scenarios without migrations. Migrations are currently not supported and will crash.
            public static void Configure(bool useCachedDbModelStore)
            {
                MyContextConfiguration.useCachedDbModelStore = useCachedDbModelStore;
            }
     
            public MyContextConfiguration()
            {
                // CachedDbModel store wird derzeit nicht immer verwendet, da er z.b. bei Migrations derzeit noch nicht funktioniert (Exceptions im EF Code)
                if (useCachedDbModelStore)
                {
                    MyDbModelStore cachedDbModelStore = new MyDbModelStore(MyContext.EfCacheDirPath);
                    IDbDependencyResolver dependencyResolver = new SingletonDependencyResolver(cachedDbModelStore);
                    AddDependencyResolver(dependencyResolver);
                }
            }
    
            private class MyDbModelStore : DefaultDbModelStore
            {
                public MyDbModelStore(string location)
                    : base(location)
                {}
    
                public override DbCompiledModel TryLoad(Type contextType)
                {
                    string path = GetFilePath(contextType);
                    if(File.Exists(path))
                    {
                        DateTime lastWriteTime = File.GetLastWriteTimeUtc(path);
                        DateTime lastWriteTimeDomainAssembly = File.GetLastWriteTimeUtc(typeof(TypeInYourDomainAssembly).Assembly.Location);
                        if (lastWriteTimeDomainAssembly > lastWriteTime)
                        {
                            File.Delete(path);
                            Tracers.EntityFramework.TraceInformation("Cached db model obsolete. Re-creating cached db model edmx.");
                        }
                    }
                    else
                    {
                        Tracers.EntityFramework.TraceInformation("No cached db model found. Creating cached db model edmx.");
                    }
    
                    return base.TryLoad(contextType);
                }
            }
    }
    Using the cached db model store saves ~ 3.5 seconds on my I7 developer machine when using a model with about 80 entities.
    Important: Since the model store has to be invalidated and rebuild every time your model changes, this method will only make sense if your entities are located within an isolated assembly. Otherwise the cache will be invalidated every time you change a line in your code and so you wont be saving anything.
    Note that you should only enable DbContextStore during normal run scenarios without migrations. Migrations are currently not supported and will crash.

2. Generate pre-compiled views

  • Before Entity Framework can execute a query or save changes to a data source, it must generate a set of local query views to access the database. These views are part of the metadata which is cached per application domain. Depending on the model size (amount of entities, associations etc.) view generation can have a significant enhancement on startup performance (1-30 seconds and more) and so caching this step is a must in order to achieve good EF startup performance.
    There are different ways to generate and store pre-compiled views, however in my opionion the easiest and most flexible way is to use this very nice nuget package: Interactive Pregenerated Views for Entity Framework 6.
    Once you have downloaded and installed the libary, you just need to configure it in your db context:
    
    // Enable DbModelStore before creating your first DbContext.
    // Do not call this method when using migrations, as they are currently not supported.
    MyContextConfiguration.Configure(useCachedDbModelStore: true);
    
    using (var ctx = new MyContext())
    {
        InteractiveViews
            .SetViewCacheFactory(
                ctx, 
                new FileViewCacheFactory(Environment.GetFolderPath(Environment.SpecialFolder.ApplicationData) + @"\YOUR_APP_NAME\EFCache\"));
    }
    Now you only pay the view generation penalty the first time you start your application. All subsequent startups will use the cached xml file and will result in significant reduced startup time.

3. Generate pre-compiled version of entityframework using n-gen to avoid jitting

  • Entity Framework does not come in the default installation of the .net Framework. Therefore, the EF assembly is not NGEN'd by default which means that EF code needs to be JITTED each time the application starts. Since EF is a really large and complex framework (EntityFramework assembly has over 5MB), and most of the code paths are needed even for simple scenarios, Jitting has a noticeable degradation on startup performance.
    Some rough benchmarks on my I7 developer machine and Core2 notebook showed a drop in startup time by about 1-2 seconds.
    On really slow machines the performance gains can even be bigger (E.x. we measured 3-4 seconds JIT time on a slow virtualized windows server instance).
    Running NGEN against EF is as simple as executing the following command within a root terminal session:
    %WINDIR%\Microsoft.NET\Framework\v4.0.30319\ngen install EntityFramework.dll
    For more information about Entity Framework 6 and NGEN I recommend this msdn article: http://msdn.microsoft.com/en-us/data/dn582034

Choosing the Right Entity Framework Workflow

Many organizations use the .NET Entity Framework to create database applications because of the automation it provides and because developers can create a model that everyone can understand using tools provided as part of Visual Studio. However, some overlook the fact that the Entity Framework supports three workflows: code first, model first, and database first. Using the right model can save developers a lot of time and effort, especially when creating a complex database design.
Databases can become incredibly complex—to the point that no one really understands the entire structure of the database used for a mission-critical application. Managing these behemoths is difficult. However, when you’re part of the development team responsible for an application that relies on the database, the task seems downright impossible without a lot of help (and it still is incredibly hard even then). That’s why Microsoft created the Entity Framework: to reduce complexity and make it possible for developers to write great applications without having to become Database Administrators (DBAs).
The Entity Framework is an object-relational mapper. That’s a fancy term, but what it means is that the Entity Framework takes the structure of the database and turns it into objects that the .NET Framework can understand. A developer uses those objects to interact with the database instead of interacting with the database directly. It’s possible to perform the full set of Create, Read, Update, and Delete (CRUD) operations using the Entity Framework features. In addition, the Entity Framework tools make it possible to perform tasks such as adding new tables or creating a new function. The Entity Framework makes developers becomes more efficient, since it interacts with the database and the developers can use familiar objects.
Creating a method to interact with the database is fine, but there are different scenarios under which a developer may have to make modifications to the database. For example, the database may only exist as coded classes at the outset and the organization may need those classes transformed into an actual database. (Perhaps the data was stored in XML files previously, but the data grew so large that a true database, such as Microsoft SQL Server, is required now.) The Entity Framework lets you handle these scenarios using three workflows: code first, model first, and database first. The word in front of “first” should give you some idea of how the workflow works, but it really is important to choose the correct workflow or you may find yourself doing a lot of rework later.

Understanding the Model First Workflow

The model first workflow was originally introduced as part of the Entity Framework 4.0 to make it possible for a developer to use a designer to create a database from scratch. The designer lets you visually define the database using an approach much like the technique for creating forms for applications. You select database elements from the Toolbox, perform some configuration, and then rus a few commands to create the database. It’s a little more complex than that, but not much. From an ease of design perspective, the model first workflow is definitely the way to go.
When using the model first approach, the designer takes over the task of creating the classes that interact with the database. The designer relies on the .EDMX file it generates to maintain the design specifics. You can effect the output of those classes through configuration changes, or modify the design directly by through the .EDMX file or by creating extensions to the design. These are advanced techniques though and tend to become quite complicated after a while; it’s often a lot easier to use one of the other workflows to overcome the limitations of this approach.
Most developers use the model first workflow on new projects where there’s no existing database or code base. One benefit of using this approach is that it makes it easier to help others see the design as you put it together. The designer provides a prototyping tool of sorts that can provide understandable output for meetings with people who wouldn’t have the skills required to understand code, but who can understand a block diagram. The overall advantages of this approach are speed of design when working with a new database and the ability to communicate with non-technical groups.

Understanding the Code First Workflow

The code first approach, part of the Entity Framework 4.1, was the last workflow Microsoft introduced. It lets you transform your coded classes into a database application, with no visual model used. Of the three workflows, this approach offers the most control over the final appearance of the application code and the resulting database. However, it’s also the most work. And it presents the biggest obstacles to communicating well with non-developers during the initial design process.
With the code first workflow, you also need to write glue code in the form of mapping and, optionally, database configuration code. However, even in this respect, the workflow provides developers with significant advantages in flexibility. You know precisely what is going on with the underlying code at all times, which is a huge advantage when working with large scale systems. The cost of this knowledge is equally huge; it takes considerably longer to develop the application (there’s no free lunch).
A code first workflow is the only realistic solution when an organization decides on a code-centric approach for an existing database. However, in this case, the developer must reverse engineer the database and create classes that reflect the database design as it exists. Microsoft does provide some assistance to the developer to perform this task in the form of the Entity Framework Power Tools, but you should expect to still end up tweaking the code to precisely match the application requirements and the underlying database.
In many respects, code first is the least useful workflow for large development teams because the lack of automation can produce consistency errors across groups. The resulting model takes more time to tweak. When using this approach, you need a strong centralized management effort to reduce the costs associated with a code-centric approach. However, when trying to integrate disparate databases (such as after an acquisition) this approach does offer significant benefits because it’s more flexible and controllable.

Understanding the Database First Workflow

The Entity Framework was originally designed to make working with existing databases easier. As a result, the database first workflow is the most polished of the three options. Given an existing database, the Entity Framework can analyze it, provide you with options for importing part or all of the structure, and then create the requisite model automatically. The underlying objects are automatically generated as well. All the developer really needs to worry about is creating the application itself; the database access is pretty much handled by the Entity Framework. In general, this feature of the Entity Framework works incredibly well and is quite fast – much faster than any developer could even contemplate doing the job.
The most significant advantage of the database first workflow (besides being incredibly fast) is that it’s consistent. Having a means of producing consistent modeling is important in a large team setting. Various team members can work on parts of the database and the resulting model will still go well together because it was produced in a consistent manner in the first place.
Be aware, though, that this is also the least flexible method of creating the underlying objects used by the .NET Framework as part of your application. The development team gains the least knowledge of precisely how things work. In fact, the objects begin as a black box that could cause you problems later if the Entity Framework encounters some oddity in the original database. To make changes to the underlying objects, you also have to rely on working with extensions, rather than modify the code directly, because the automation overwrites any changes you make otherwise. This leads to problems of figuring out just which file to look in for changes.

Bottom Line

Choosing a workflow is a matter of defining precisely how you plan to interact with the database and taking stock of the kinds of your resources. It’s also essential to consider issues such as the amount of flexibility required to interact with complex database designs.
In many cases, you’ll find that you actually need to combine workflows to obtain the best result. For example, if you have a lot of existing code, yet need to work with existing data as well, you may need to combine the code first and database first approaches. However, when conflicts exist, you may actually need to use the database first approach to import the existing structure and then rely on the model first workflow to overcome the differences between the existing applications and the database.
It’s also important to remember the source of conflicts most generally lie in consolidation. Whether a company has downsized and now needs to combine departments or it made an acquisition and needs to integrate the other organization’s data into the existing database, the source of the problem is the same. Achieving a consolidated, yet effective, data model is essential before you can make any real progress in managing it.

Wednesday, June 24, 2015

Image Gallery => Image Enlarge ( Display Images in GridView Preview )

<html xmlns="http://www.w3.org/1999/xhtml">
<head runat="server">
    <title>GridView Images Example</title>

<script type="text/javascript">
 function LoadDiv(url)
 {
    var img = new Image();
    var bcgDiv = document.getElementById("divBackground");
    var imgDiv = document.getElementById("divImage");
    var imgFull = document.getElementById("imgFull");
    var imgLoader= document.getElementById("imgLoader");

    imgLoader.style.display = "block";
    img.onload = function() {
        imgFull.src = img.src;
        imgFull.style.display = "block";
        imgLoader.style.display = "none";
    };
    img.src= url;
    var width = document.body.clientWidth;
    if (document.body.clientHeight > document.body.scrollHeight)
    {
        bcgDiv.style.height = document.body.clientHeight + "px";
    }
    else
    {
        bcgDiv.style.height = document.body.scrollHeight + "px" ;
    }

    imgDiv.style.left = (width-650)/2 + "px";
    imgDiv.style.top =  "20px";
    bcgDiv.style.width="100%";
 
     bcgDiv.style.display="block";
    imgDiv.style.display="block";
    return false;
 }
 function HideDiv()
 {
    var bcgDiv = document.getElementById("divBackground");
    var imgDiv = document.getElementById("divImage");
    var imgFull = document.getElementById("imgFull");
    if (bcgDiv != null)
    {
        bcgDiv.style.display="none";
        imgDiv.style.display="none";
        imgFull.style.display = "none";
    }
 }
</script>

<style type="text/css">
     body
     {
        margin:0;
        padding:0;
        height:100%;
        overflow-y:auto;
     }
     .modal
     {
        display: none;
        position: absolute;
        top: 0px;
        left: 0px;
        background-color:black;
        z-index:100;
        opacity: 0.8;
        filter: alpha(opacity=60);
        -moz-opacity:0.8;
        min-height: 100%;
     }
     #divImage
     {
        display: none;
        z-index: 1000;
        position: fixed;
        top: 0;
        left: 0;
        background-color:White;
        height: 550px;
        width: 600px;
        padding: 3px;
        border: solid 1px black;
     }
     * html #divImage {position:absolute;}
</style>
<!--[if lte IE 6]>
   <style type="text/css">
   /*<![CDATA[*/
html {overflow-x:auto; overflow-y:hidden;}
   /*]]>*/
   </style>
<![endif]-->
</head>
<body>
    <form id="form1" runat="server">
        <div>
            <br />
<asp:GridView ID="GridView1" runat="server" AutoGenerateColumns="false"
  Font-Names="Arial">
<Columns>
    <asp:BoundField DataField="ID" HeaderText="ID" />
    <asp:BoundField DataField="FileName" HeaderText="Image Name" />
    <asp:TemplateField HeaderText="Preview Image">
        <ItemTemplate>
            <asp:ImageButton ID="ImageButton1" runat="server"
            ImageUrl='<%# Eval("FilePath")%>' Width="100px"
            Height="100px" Style="cursor: pointer"
            OnClientClick = "return LoadDiv(this.src);"
            />
        </ItemTemplate>
    </asp:TemplateField>
</Columns>
</asp:GridView>
        </div>
     
<div id="divBackground" class="modal">
</div>
<div id="divImage" class = "info">
    <table style="height: 100%; width: 100%">
        <tr>
            <td valign="middle" align="center">
                <img id="imgLoader" alt=""
                 src="images/loader.gif" />
                <img id="imgFull" runat="server" alt="" src=""
                 style="display: none;
                height: 500px;width: 590px" />
            </td>
        </tr>
        <tr>
            <td align="center" valign="bottom">
                <input id="btnClose" type="button" value="close"
                 onclick="HideDiv()"/>
            </td>
        </tr>
    </table>
</div>
    </form>
</body>
</html>

Difference: Website vs Web Application

Difference: Website vs Web Application – Which is best?

Now here in this tutorial, I’ll explain the main differences between the website and web application in asp.net.

Difference: Website vs Web Application

So, now a question is what’s the difference between a website and a web application?
ahhh..
Not a lot more or everything. It’s mostly a matter of perspective and semantics and is largely opinion based.
In my perspective, generally a website is defined by its static content and web application is defined by its user interaction that requires programmatic user input or data processing.
The basic distinction would be if a website is connected with a database and stores user data or modifies what the user sees based on some user specified criteria, then it’s probably a web application. Whereas on other hand, the static files such as .html that link pages to one another, I would say it’s a website.
Note: Keep in mind that the difference is obviously a personal or a subjective.
When you create a new project in Visual Studio, You’ll see there are two options offering you to create a new project, one option is Website and another option is Web Application (New Project). So, you can select your option as per your requirements.
In my opinion, following are few points that practically differentiate both of them:
WebsiteWeb Application
A Website is InformationalA Web Application is Interactive
All the files in folder structure are automatically included in the website. There is no.csproj/.vbproj project files in WebsiteA Visual Studio .csproj/.vbproj project file stores information about the Web Application, such as list of included project files or any internal or external project to project references
When you deploy or publish Website, you need to upload both .aspx and .cs/.vb files to the serverWhen you deploy or publish Web Application, you only need to upload .aspx files and there is no need to upload .cs/.vb files because code-behind files are pre-compiled in .dll file
By default explicit namespaces are not added to pages, controls or classes, but you can add them manuallyBy default explicit namespaces are added to pages, controls and classes
There is no need to re-compile or built the website before publish or deploymentYou need to re-compile or built the web application before publish or deployment because it contains .dll files with reference of other project file details

Website vs Web Application – Which is best and appropriate?

As I explained above, when you want to create an Informational project, then go for Website and when you want to create an Interactive project that requires programmatic user input or data processing, and then go for Web Application.

Can we convert one project type to other?

No, you must select the appropriate project type before you create a project, because it’s not practical to convert from one project type to the other.